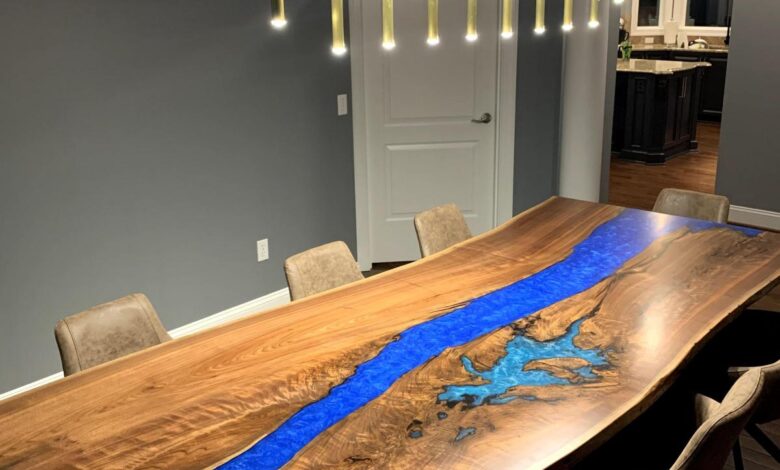
When used in crafting, an epoxy resin finish can add an interesting textural element to a piece as well as provide protection from the elements. With the right supplies, you can turn this versatile material into an amazing table for your home or outdoor space!
Or search river table near me to buy these premium tables.
What You’ll Need?
– Epoxy resin – This liquid resin will be the base of your table and turn into a hard and durable finish once dried.
– Foam – You’ll need foam to create the base of your table with a hole in the middle.
– Plastic sheeting – This plastic sheeting will form a barrier between the base of your table and the surface you work on.
– Casting material – You’ll need this casting material to create the top of your table.
– Wood scraps – You’ll need some wood scraps to create a unique pattern on the top of your table.
– Mask – This mask is used during the mixing process to protect you from inhaling harmful fumes.
– Gloves – You’ll need gloves to protect your hands from the resin.
Create the Base of Your Table
– Measure and cut your foam into a square or rectangle to create the base of your table.
– Place the base of your table on top of the plastic sheeting.
– Place your wood scraps on the plastic sheeting on top of the base of your table.
– Mix up the epoxy resin and pour it into the hole in the middle of your table.
– Let the resin cure.
– Remove the wood scraps and plastic sheeting.
– Sand and finish your table.
Mix and Pour the Resin
– Mix the epoxy resin and water together according to the manufacturer’s directions.
– Pour the mixture into the bottom of your table to create a thick layer about 1/4 inch thick.
– Let the resin cure.
– Mix up the second batch of epoxy resin.
– Pour the resin on top of the first resin layer and let it cure.
– Mix up the third batch of epoxy resin.
– Pour this resin on top of the second layer and let it cure.
Create a Unique Top for Your Table
– Measure and cut your casting material into a rectangle to create the top of your table.
– Create a texture on the tabletop using various tools, including a knife and sandpaper.
– Place the tabletop on top of the epoxy resin layers.
– Let the resin cure.
– Sand and finish your table.
Coated with Multiple Layers of Resin
– Mix up the fourth batch of epoxy resin.
– Pour the resin on top of the table, covering the entire top.
– Let the resin cure.
– Remove the table from the plastic sheeting and sand it.
– Apply a coating of clear epoxy resin to the top of your table for added protection.
Summary
Making a resin table in Kelowna out of epoxy resin is a unique way to add a different texture and design to your home decor. This table can also be used outdoors as it is protected by durable epoxy resin. You can customize the look of your table depending on the pattern you create on the top of the table with the wood scraps and the texture you create on the tabletop with the different tools.